Configuring Remote Connection in FreeScribe
Follow these step-by-step instructions to configure a remote connection for FreeScribe.
General Remote AI Settings
Open the Settings window and navigate to the “AI Settings” tab.
Configure the following fields:
Model Endpoint: Enter the API URL of your remote server. For example:
https://api.openai.com/v1/OpenAI API Key: Paste your OpenAI API key here. Example:
7X1PXospvS7_CtuxvuilmVZA
- Optional Settings:
Local LLM: Uncheck this if you are using a remote endpoint instead of a local model.
AI Server Self-Signed Certificates: Enable this only if your remote server uses self-signed certificates.
Click “Save” to apply the changes.
Configuring Speech-to-Text Remote Connection
In the Settings window, go to the “Speech-to-Text Settings” tab.
Enable Speech-to-Text for remote connection by configuring these fields:
Speech2Text (Whisper) Endpoint: Enter the URL for your Speech-to-Text API. For example:
https://localhost:2224/whisperSpeech2Text (Whisper) API Key: Paste the API key provided for your remote Whisper server.
- Optional Settings:
Real Time: Check this option to enable real-time transcription.
S2T Server Self-Signed Certificates: Enable this only if your remote server uses self-signed certificates.
Select a Microphone: Choose the appropriate microphone input device.
Whisper Model: Local Only.
Speech2Text (Whisper) Architecture: Not needed for remote connections.
Click “Save” to save the settings.
Verify the Connection
- After saving the configuration:
Restart FreeScribe to ensure the new settings take effect.
Verify that the connection to the remote AI model and Speech-to-Text API is working as expected.
- If issues occur:
Double-check the Model Endpoint and API Key.
Ensure the remote server is running and accessible.
Confirm the server URL and port are correct.
Summary of Key Fields
The following table summarizes the key fields for configuration:
Setting Key |
Example Value |
Description |
Model Endpoint |
|
Remote API endpoint for AI models. |
OpenAI API Key |
|
API key for accessing the remote AI service. |
Speech2Text (Whisper) Endpoint |
|
API endpoint for Speech-to-Text services. |
Speech2Text (Whisper) API Key |
|
API key for the Speech-to-Text server. |
By following these steps, you can successfully configure a remote AI model and Speech-to-Text connection in FreeScribe.
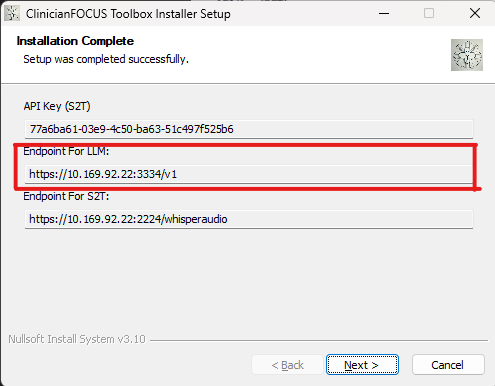
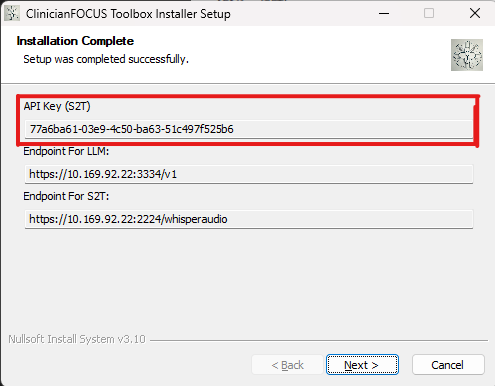
How to connect to ClinicianFOCUS LLM Container
Open the Settings window and navigate to the “AI Settings” tab.
Configure the following fields:
Model Endpoint: Enter the API URL of your remote server. Example:
https://api.openai.com/v1/
OpenAI API Key: Paste your OpenAI API key here. Example:
The API Key provided in the installer
Local LLM: Ensure this is unchecked in the FreeScribe settings.
Repeat for Whisper Settings tab.
Click “Save” to apply the changes.
How to connect to JanAI
Open the Settings window and navigate to the “AI Settings” tab.
- JanAI reference screenshot:

Click on Step 1 and 2 in the photo. Then proceed to the next step below.
- Configure the following fields:
Model Endpoint: Enter the API URL the JanAI server. Combine the information from steps 3 and 4. Example:
https://localhost:1337/v1Note: JanAI does not require an API key. So this can be left blank.